Summary:
- Introduction
- Handling conflicts in input data
- Input and output files
- Describing complex groups
- Configuration
- Command Line Options
Introduction
Short basic example
As a quick example, consider the following text input file called demoA_1.csv, that describes four events:
This means that on Monday (M) of week 30, the student-group A will have:
- a math course with Joe on first timeslot of the morning (M1), in room A1, for a duration of 1 time slot;
- a physics course with Bill on second timeslot of the morning (M2), in room A1, for a duration of 1 time slot;
- an english course with Susan on first timeslot of the afternoon (A1), in room A1, for a duration of 2 time slots;
Additionaly, it also says that thursday is off.
Then, if you run from shell the following command:
gensched demoA_1.csv
it will generate a folder named demoA_1 in which you can find this html page.
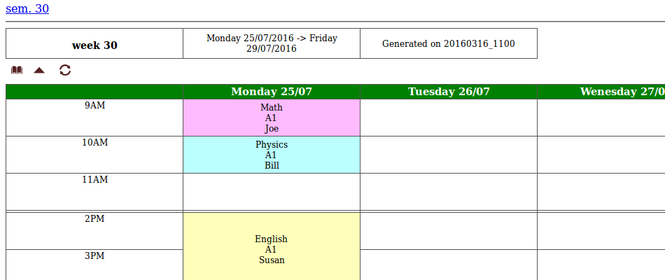
Now lets see a slightly more complex example covering two weeks and two groups of students, A and B. The following file:
will generate this html page.
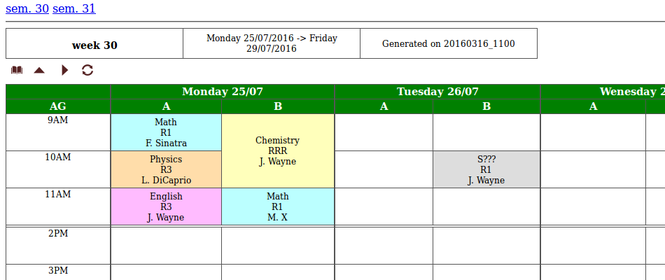
So you got the point: a line in the input file describes an event, which holds:
- the week, day, timeslot,
- a student group,
- an instructor,
- a room,
and its duration, expressed as the number of time slots. More on this in the following section.
Basic Concepts
Grid-based time slots
As opposed to traditional calendar software, where all events have an arbitrary time of start and duration, gensched is targeted at scholar or university scheduling: with this type of schedule, the schools organization is based on some grid: we have common opening hours, the courses start all at the same time, have the same length, so groups of students can switch from one class room to another.
So the software is based on the concept of time slot: an events starts at some point in this grid, and has a length that is a multiple of an atomic lenth. This one is usually 60 or 90 minutes, you can define this.
Events
Input data is based on the concept of event. An event is a line of text in the input file, as seen above. It can be of two types: a regular event or a special event.
A regular event is just some teaching event. It has the following items:
- a week number,
- a day in the week, expressed as some short code (say M for Monday, Tu for Tuesday, ...);
- a time slot, expressed as some short code code (default is "M1" for first time slot of the morning, or "A2" for second time slot of the afternoon);
- an instructor;
- a room;
- a subject;
- a group of students;
- a type of group, either an atomic group (a group that cannot be divided, usually a "lab" group), a class group, that holds several atomic groups, or a division group.
- a duration, expressed as a factor of a base duration;
The input data is basically a list of events as described above, using the classical csv format. It does not need to be sorted in any way. Empty lines are allowed.
All the codes used in the samples above can be personnalized, we'll get to this later. If some information is unknown (say, you don't know who will take in charge some course, or you don't know what rooms will be available), then you can signal this by using some special code for this field. See Option: -f (deFaults).
Additionaly, events can have a "comment" field, that will be used as html cell title, so it appears when hovering over with mouse.
Special Events
Special events are identified by a "group" field prefixed with '*'. They are two kinds special events:
- "off" days, where the school is closed (for whatever reason)
- non-teaching events
For "off" days, it is produced by setting the "group" field to the string *OFF. This event in the input file will have two consequences:
- the corresponding day will appear as an off day (see for example demoA_1).
- any regular event happening that day will be tagged as "conflicted" (and appear as so).
- all other fields except week, day and comment will be ignored.
The text appearing in the schedule will be generic ("OFF" at present), unless the event has the "comment" field not empty. In that case, it is this latter text that will appear.
Non-teaching events are identified by a *SPE, in "group type" field. These are used for meetings, or any other stuff not related to teaching. These events hold all the stuff of regular events (except for "group type", of course). The only difference is that these events do not count as work time for the instructors.
Workflow
If you want to use this software, the workflow is as follows:
- : edit the input csv file with your data, manually or more conveniently by using a spreadsheet software. This way, you can hold your data in some independent file, and use the spreadsheet to export to csv. See Using with LibreOffice
- : run gensched (manually, or more conveniently through a script you have written previously. See Command Line Options),
- : check output files, and in case of remaining conflicts, go back to step 1.
- : publish output html files online through ftp, or by mail after printing as pdf files, ... or whatever you want.
While it is possible to manually edit small csv files with a basic text editor, using a spreadsheet software has many advantages. The biggest is the ability to use so-called "auto-filters", so you can show only part of the data. For example, say you have a file of ~1000 events. Searching through these to find the one occurring on a given week and a day with a given instructor, just to change the room, this will be tedious. Instead, with the auto-filters, you can select the needed criterions until you find what you want, then edit the data, and save the file. Below is a figure showing the usage of Libreoffice-calc for this task.
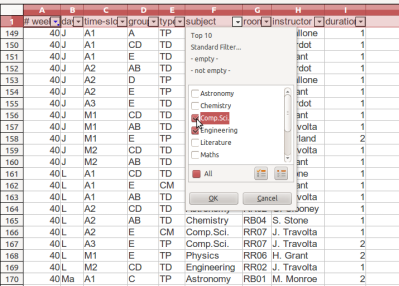
Once you have edited the file, all you need to do is to save the whole file as a csv file (File->Save As). As this task has to be done each time, it is easier to record a macro that automates this. Then, add a button in the toolbar and associate it with the macro.
Handling conflicts in input data
Once in a while, you may provide some input data that has some problems. These can be of two types:
- either it is not a valid line (say you provide a timeslot code that is not recognized, of an empty field)
- either it is perfectly valid but is inconsistent with another event of the file (for example, assigning an instructor to two different groups of students at the same time).
For the first point, invalid lines in the input file will be shown on the "stats" page, and will be ignored for the rest of the process. For the second point, four types of inconsistencies are handled:
- when you assign an instructor at the same time slot with two different student groups,
- when you assign the same room for two different student groups,
- when you assign an instructor at the same time slot with two different student groups.
- when you assign some event on a "off" day (see above, Special Events).
All of these are filed and a special page is generated that summarizes all the conflicts that were encountered during the process. Besides, on the schedule page, the events that are in a conflicted state are shown with a special color, and the table cell has an additional "title" attribute showing the nature of the conflict. By hovering the mouse on it, the user can immediatly see what the problem is. A special warning is also printed at the bottom of the table, with the total number of conflicts on this week and a link on the dedicated page.
But lets see an example. Lets consider this sample input file: demoA_3.csv
At first, it is not obvious to see where the problems are. But processing this file will generate this schedule page.
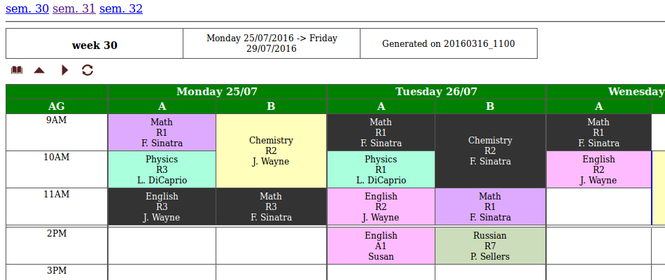
Several conflicts appear on this week. Conveniently, a link at the bottom of the week leads to the generated "conflicts" page, where a more detailed description is given. Besides, hovering with the mouse over the conflicted cells gives some information about the nature of the conflict, as it can be seen below:
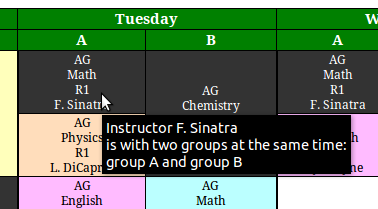
Also, you might have noticed that the last three lines of the above input file are invalid. One uses "T" for "Tuesday", instead of "Tu". Another has "AZ2" as time slot code, which is invalid. The last line uses "AGH" as group type field, which is also invalid. This is detected at runtime, and these events are ignored. They appear as such on the relevant stats page, so user can check out and correct his input file. Moreover, the main index page mentions the number of invalid lines, if any.
Input and output files
Besides the actual html schedule, gensched generates several other html files that are linked through an index, see this file for example. These files will be inside a folder named from the input files that will be created at runtime . Additionaly, other input files can be provided, so the real diagram is more like this:

The auxiliary input files serve different purposes, and must be described separatly:
gensched.iniholds all the general configuration of the software. It is optional (it can run without), default values are provided. But if present in the current folder, it will be automatically read and used.groups.ini(or any name you want as long as it has the .ini extension) is optional. It is required if you need to describe a complex groups structure, see Option: -g <groups_file> and Describing complex groups.volumes.refis also optional. It is a csv data file that can be used to provide a reference course volume per each subject, that will be printed out on the page "Volume per group per subject" on first line, to enable checking that the schedule provides enough volume of courses for every subject. See Including reference volume.
This generated index page links to:
- a page summarizing the total volume that student groups have per week
- a page describing the total volume for each subject, per group
- the total worktime for each instructor, per subject and per division.
- a page describing, week per week, the volume for each group and each subject
- the schedule page, with colors per subject
- the schedule page, with colors per instructor
- tables (one per division), showing course volume per instructor and per subject.
See for example index.
Describing complex groups
This first two examples (see Samples ) describe the simplest situation where you have one type of "groups". However, in real life, it gets more complicated. gensched allows you to deal with all kinds of situations.
First, a course has a type: it can be designed as a lab work, a class work, or a classical course where the instructor gives a talk (aka a "lecture"). Usually, this is also related to the number of students: small group for a lab, class group, or several groups in a large conference room. In France, this is usually called TP ("Travaux Pratiques"), TD ("Travaux Dirigés"), and CM ("Cours Magistral").
We define the group types as:
- atomic groups, which is the smallest student group that can not be divided (thus its name). Those are usually called "Lab" groups.
- class groups, holding several atomic groups (usually 2 or 3, but 1 is valid too).
- divisions, holding several class groups, that themselves hold one or more class groups. These are usually used for lectures.
The type of course appears in the different tables in the ouput with a codification that is the same as in the input data file. The default codes are:
- AG for atomic groups,
- CG for class groups,
- DG for divisions.
This can be personnalized by configuration file (see Configuration). French users will replace this with the classical CM/TD/TP.
Thus, for each event, one needs to define both the type of course, and the corresponding student group. If you are in the simplest case where you only handle so-called atomic groups, this list of these is build automatically. Else, the groups must be given through an additional .ini input file, either through command-line or through general configuration file. See for example demoB_4b and the corresponding groups file demo/groups_demoB_4b.ini:
; this file holds the trainees groups organisation for demo4

; this is the list of ALL the student atomic groups
[atomic]
groups=A,B

; this is the list of class groups
[class]
groups=Z

; here, there MUST be a line for each of the class groups above
Z=A,B
We define here a class group named 'Z', that holds the two atomic groups A and B.
Please notice that in the corresponding input file, we need to specify that the English course is a "class" event, with the code "CG" in the course type.
- Warning
- It is required that in the "groups" file, the atomic groups are given first, to ensure at reading that other groups only use atomic groups that have been registered.
The third level of groups is the "division" level: see for example demoB_4c, that also has more realistic group names: we have 4 atomic groups named A,B,C,D, two class groups named AB and CD, and one division named ABCD. And, yes, the names of the groups are totally free.
Configuration
Section summary:
- Configuration file
- Including reference volume
- Internationalization
- Command Line Options
- Current defaults values
The software has a lot of configuration options. Some options can also be given through command-line (see Command Line Options). Other parameters must be given through configuration file (gensched.ini), that is read at startup. Some can be given both ways, in that case the command-line options overrides the values given in configuration file.
The current run-time options can be checked directly from shell with Option: -f (deFaults), but main options are also printed in output files in a separate "help" page, see for example this page.
Configuration file
The format of the files follows classical "ini" files, see http://en.wikipedia.org/wiki/INI_file, and whose structure match the following example:
; gensched.ini
[section1]
parameter1=hehehe
parameter2=hohoho
The configuration file allows to change many things in the default behaviour of the software, in many aspects. It is a regular "ini" file. The default behaviour is to check for a file named gensched.ini, but if command-line option -p if used, one can provide a configuration file with any name.
Input data fields
The order of fields in the input file can be changed, through a section named InputFileFields. Below is an example of such a section, showing the allowed field names. Beware, if not present, the field index keeps its default value, and it could conflict with one of the given values. This is checked after loading of the file.
Calendar configuration
The section [calendar] is there to mention the current year. All dates are automatically computed from week numbers and week days.
General
The section [general] allows changing some global options, for example:
NbTimeSlotsAMholds the number of time slots in the morning. It is used to add a separation line in the output schedule for lunchtime. If you do not want such a separation, just addPrintNoonSepLine=0in the file.atomic_durationis the duration, expressed in hours, of the root time slot unit. For example, if equal to 1.5, this means that each time slot is 90 minutes.NbTimeSlotsandNbDaysare needed and requested only if you need to personnalize the codes and names for, respectively, time slots and days.
Besides the above pairs, a number of boolean switches can be set (=1) or unset (=0) though this configuration file. Their description can be seen here. Some of these can be overriden by a command-line switch, see Command Line Options. To see their default values, check Option: -f (deFaults).
| Switch name | Description | Command line option |
|---|---|---|
OnePagePerDiv | If true, the divisions will be printed out on separate pages. This can be needed when many divisions to avoid a cluttered page. | |
OnePagePerWeek | If true, the different weeks will be printed out on separate pages. Can be useful to lighten page and speed up download, in case of many weeks with heavy content. | |
ColorPerSubject | If true, the automatic cell colors will be set depending on the "subject" field. Else, it will be set according to the "instructor" field. | |
PrintDayDate | If true, each week day will hold its date in table header. | |
PrintUnknowItem | If true, each field with the predefined "unknown" field will be printed out as such. Set this to false will only show the known information. | |
OutputTimeStamp | Set this to true if you wan the output folder to be time stamped, so you can later compare different versions. | |
PrintEventType | If true, the type of the event will be printed in each schedule cell. Set to false if unneeded. | |
PrintNoonSepLine | Set to false if you don't want a noon separation line. | |
CopyStyleSheets | Set this to false if you have personnalized style sheets, so they don't don't get overwritten by the default ones at every run. | |
CommentFormatting | Set this to false if you don't want on the schedule page the special markup for events that hold a comment. |
Sections
This section is used to give the names of the class types as they appear in the output html tables, and as they are given in the input file. In France, this should stay as follows:
[sectioning]
atomic_name=TP
class_name=TD
division_name=CM
Day codes and names
The sections day_codes and day_names allow for personnalizing code/names for days. Adding these sections requires adding a key NbDays in section general, see General.
Any combination is possible, for example, french users will probably want this:
[day_codes]
day0=L
day1=Ma
day2=Me
day3=J
day4=V

[day_names]
day0=Lundi
day1=Mardi
day2=Mercredi
day3=Jeudi
day4=Vendredi
Be aware, that these two sections are closely related and must have the same number of items, and items of both lists will match.
Time slots codes and names
The sections TS_codes and TS_names allow for personnalizing code/names for time slots. The "code" if for what will be read in the input data file, the "value" is what will be printed out on the schedule page. Be aware that these are just textual tags, and have no meaningful duration information.
Similarly to previous section, this requires adding a key NbTimeSlots.
As an example, these are the codes and values for 90mn slots, identified by "Ax" for "AM" time slots, and "Px" for "PM "time slots.
[TS_codes]
TS0=M1
TS1=M2
TS2=A1
TS3=A2
TS4=A3
TS5=A4

[TS_names]
TS0=8h30
TS1=10h
TS2=13h
TS3=14h30
TS4=16h
TS5=17h30
Including reference volume
In order to compare actual course volumes with a "reference" volume, you can provide this reference as an additional csv file holding for each subject and for each course type the volume reference. This volume will then automatically appear in the "volume per subject" page, see this for example.
The volume is given in the form subject,volume:
; volume reference file for demoD_full
; holds course volumes for each type of groups
; order: Subject, Lecture volume, Class volume, Lab volume

Astronomy,4,5,12
Biology,2,4,15
Chemistry,0,20,2
Comp.Sci.,15,5,5
Engineering,5,10,10
Literature,10,5,0
WebD,0,5,5
Maths,3,10,30
Physics,5,5,15

# some random comment and empty line

Psychology,15,4,4
Sociology,2,5,6
Internationalization
This software can produce output in any language at run-time, as long as the corresponding language file is provided. English is the default language, but a french language file is also provided in current release, feel free to submit other language files.
The system is based on a local key, build using an enum. Check file LF_fr.ini as an example.
The choice of language is done through a command-line option, see Option: -l <language_code>.
If you add a language file, you need to add the corresponding language code in source file main.cpp (check for gv_LangCodes), and rebuild the software (see Building the software).
Command Line Options
The general syntax is:
gensched [options] input_file
For other configuration not accessible through command-line, see Configuration.
Summary:
- Option: -h (Help)
- Option: -H
- Option: -d (Debug)
- Option: -f (deFaults)
- Option: -t (Timestamp)
- Option: -g <groups_file>
- Option: -l <language_code>
- Option: -n (No CSS copy)
- Option: -v
- Option: -w <week-string>
- option: -c (show Course type)
- option: -p <file.ini> (configuration file)
- option: -i (colors per Instructor)
- option: -y <year>
Option: -h (Help)
Prints a short help message and exits.
Option: -H
Starts the default browser and shows full doc from local files, then exits.
Option: -d (Debug)
If given, enable "debug" mode: lots of run-time information is dumped in stderr. Running in this mode should be done with stderr redirected, i.e.:
Option: -f (deFaults)
Prints the default configuration values (groups code, week days names and codes, unknown information codes, ...) and exits.
Option: -t (Timestamp)
- if not given, the default behaviour is to create a folder with the same name than the input file, and store the output files in that folder.
- if given, the output folder name will be appended with a time stamp, in the form "YYYYMMDD_HHMM"
Option: -g <groups_file>
if given, the file provided will be used as groups file. See Describing complex groups and demo4, on page Samples .
Option: -l <language_code>
- if given, will generate output files with language file corresponding to <language_code>. At present, only
fr(French) is provided. - if not given, will use the default language (english)
Option: -n (No CSS copy)
If given, copy of standard CSS stylesheets in output folder will not be done. This option is needed if user wants to provide his own stylesheets, or if he has edited the standard ones after a first run.
Option: -v
This flag enables the "verbose" mode, giving some more output
Option: -w <week-string>
Enables the user to select which weeks he want to extract from the input data.
If not given, the week set will be build automatically from input file and the weeks will be ordered. This is handy, but in many situations (scholar year), the semester starts around week 35 to 39 (september), goes until end of december, and continues often with week 2 and 3 in january. Thus, this automatic mode is not suitable because week 2 will appear before week 36.
This option can be used to give the desired weeks in the desired order, and only those will appear in the ouput, independently of the data in the input file. If a requested week has not events in the input file, then the schedule for that week will appear empty.
Some examples:
gensched -w "34,40,50" myfile.csv
will extract only weeks 34, 40 and 50 from input file
gensched -w "34-36,50" myfile.csv
will extract only weeks 34, 35, 36 and 50 from input file
gensched -w "34-36,50-51,2" myfile.csv
will extract only weeks 34, 35, 36, 50, 51 and 2 from input file
Checking is done to make sure that user doesn't request something invalid, for example the following line:
gensched -w "36-34"
will fail, as it doesn't really make sense to print out weeks in reverse order. But the following:
gensched -w "36,35,34"
will succeed.
option: -c (show Course type)
If given, then the course types will not be printed in schedule page table cells.
option: -p <file.ini> (configuration file)
Load file.ini as configuration file instead of the default gensched.ini
option: -i (colors per Instructor)
If used, then the colors in the schedule page will be related to the instructor (default is related to the subject)
option: -y <year>
Overrides the year given in configuration file
Current defaults values
Using command-line with Option: -f (deFaults), here are the default values given by current build:
 1.8.6
1.8.6